

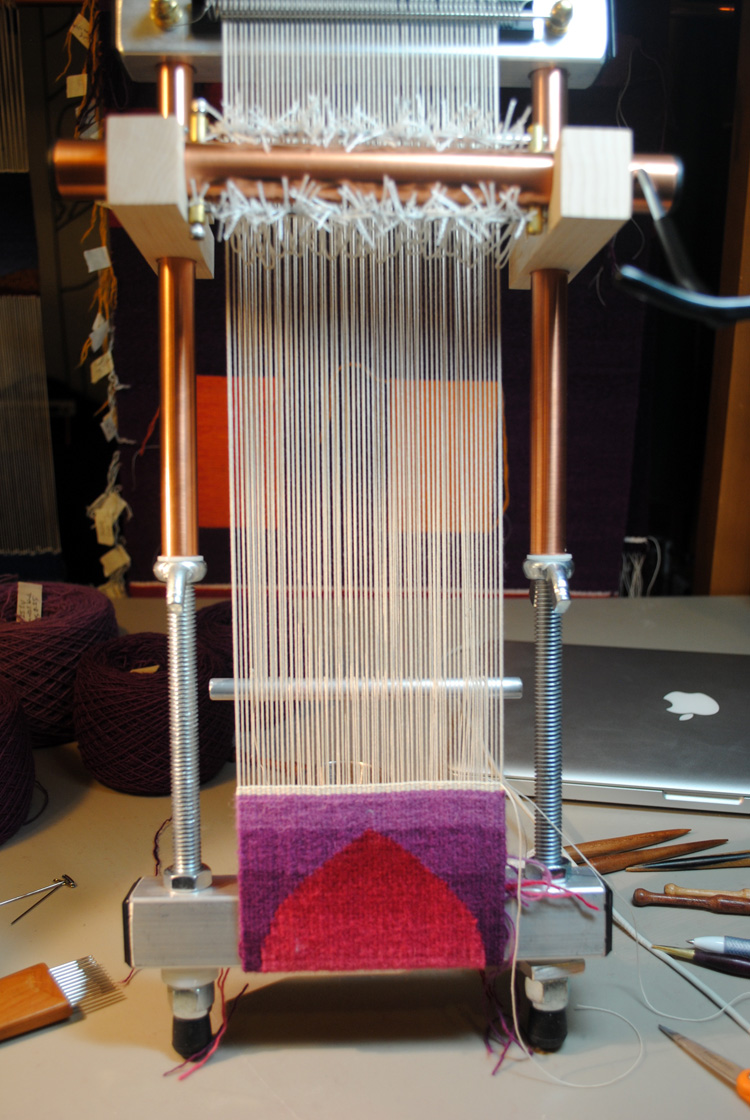
Lani Mirrix loom being warped. Tapestries waiting for finishing hanging behind...
No matter how you feel about the current political situation in the United States, it is undeniable that this country is hurting. Now, more than ever, we need to love each other. And this is so freakin' hard! It is hard to watch hate spilling all over everywhere and come back with love. Some days, I'll admit, it feels impossible.
Valentines days seems like a day to remember this particular struggle and maybe we should just admit we are human and start with showering loving attention on the people nearest to us. While I'm not a big fan of this ultra-commercialized "holiday", I do believe that humans need to come together on a heart level, now more than ever.
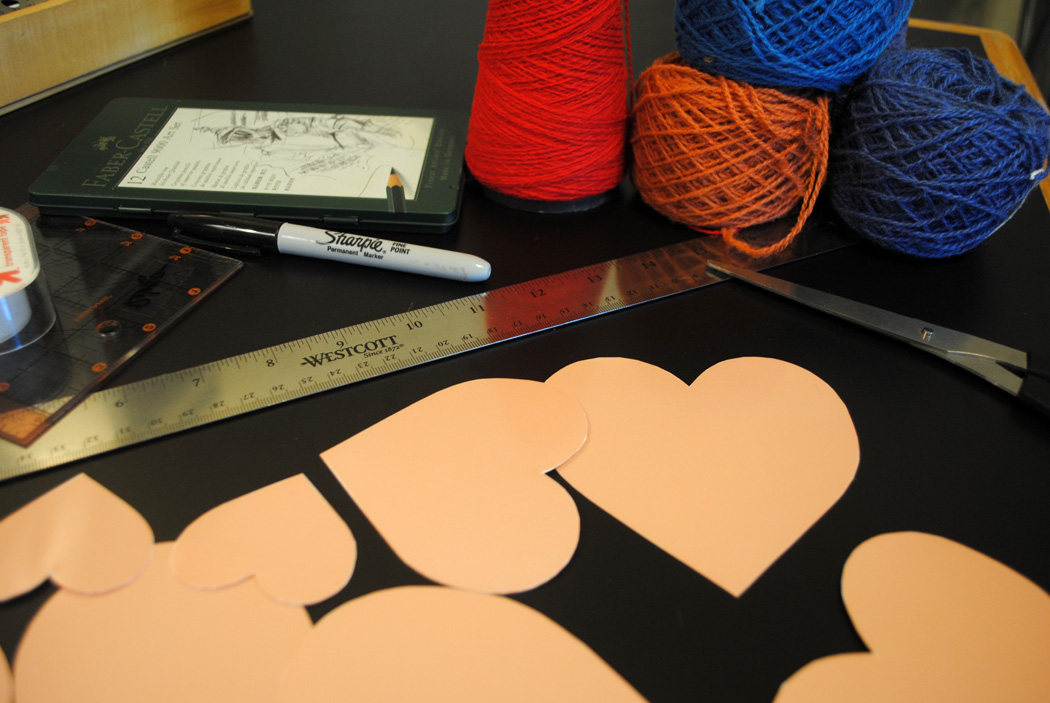
So this Valentine's day, join me in a little weaving project. Let's see if we can weave ourselves a community of understanding and have some fun in the process. Below I show you how I wove a little heart. At the end of the post you will find a link to download a PDF with instructions and a template for various size hearts.
I recently acquired a Mirrix Lani loom. Previously, the smallest Mirrix I had tried was the 12 inch Little Guy. The Lani came my way and was sitting in the corner crying to me every time I walked past on the way to a bigger loom... "warp me, warp me!" And yes, I did use a shedding device on this tiny loom. I do extend the small looms as far as I can as it helps a lot with more play in the warp.**** The shedding device is super super tight if you have the loom collapsed. Sometimes I even put warp extenders on to help with this. Yes, I usually "waste" a little warp, but it is nothing compared to the loom waste from my Harrisville Rug Loom! Just look at it as part of using this particular equipment OR you can plan several projects on that longer warp and use it all up.
For this particular project, I warped the Lani 4.5 inches wide at 12 epi with 20/6 cotton seine twine (someone will ask). This loom will only warp to 5 inches wide, so I wound off some warp onto a boat shuttle bobbin (you could also use a piece of cardboard or a tapestry bobbin) so that it would fit easily inside the tiny loom as I warped. Also remember that if you want your heart centered in the middle of the warp and you want the heart to end on a point instead of two warps, you should use an odd number of warps.
Weaving a simple heart
For this project, I wanted to weave a very simple heart shape. If you'd like a bigger challenge, keep reading. I made a template (which you can download in the PDF linked below) and cut out all the hearts. I printed my template on photo paper just because it is a little thicker than regular paper.

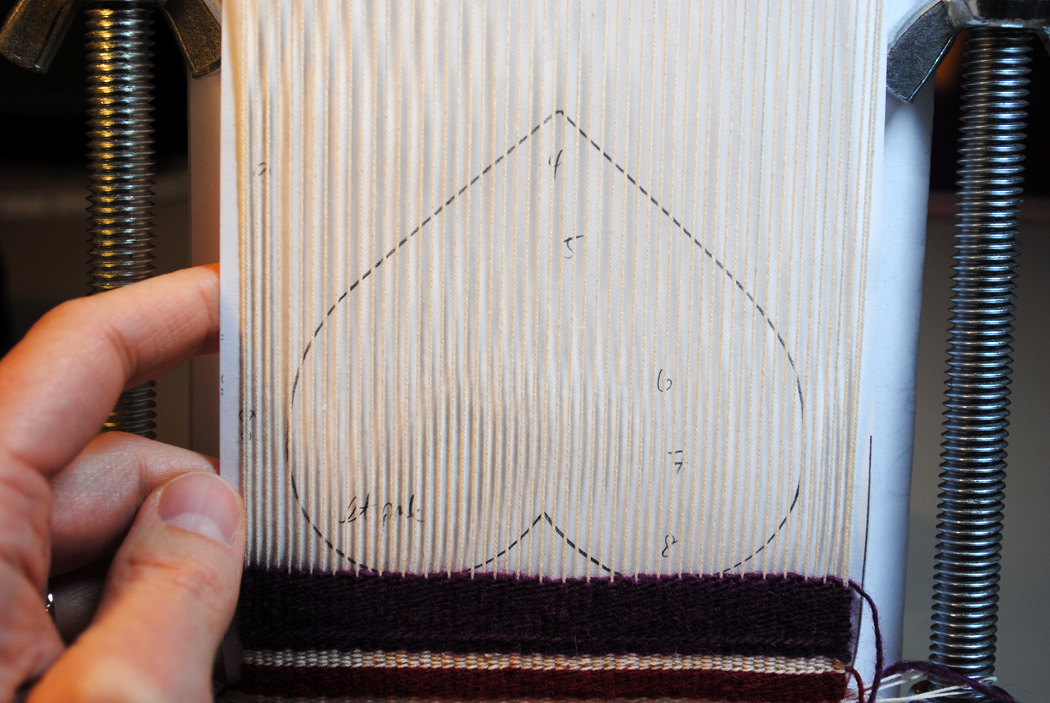
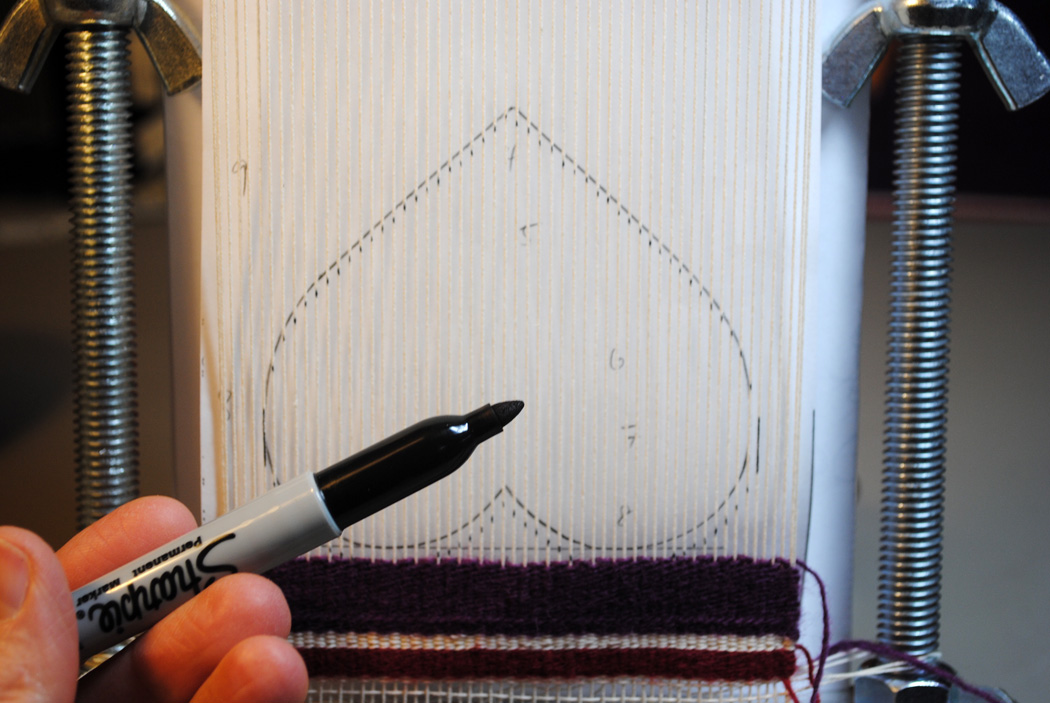
For my project, I wanted to weave just one heart. I chose the medium sized heart and wove it on a warp 4.5 inches wide. I traced the heart onto a piece of paper and then dotted that cartoon onto the warp. Take care to leave yourself enough room on either side of your design. A heart has a much longer vertical line at each side than we like to think it does (just like a circle does!). You want to leave at least two warps on either side of the heart. I left four (which was a third of an inch at 12 epi).
I wove my heart upside down because I feel that it is an easier orientation to weave this shape. I'd rather start the triangular shapes at the wide part of the triangle than at a point. Certainly it is possible to start a shape at a point, but I think you'll find that weaving it upside down is simpler. (For those of you with more experience, what would happen if you wove a heart-shape sideways? How would this be beneficial for the final weaving?)*
You can weave the heart any way you'd like. As you'll see in the photos below, I wove it a shape at a time. I started with weaving the left side, then added the bobbins for the two parts of the heart and the two other background colors. I set these in at the same time to make sure that I had meet and separate happening between each of the bobbins.

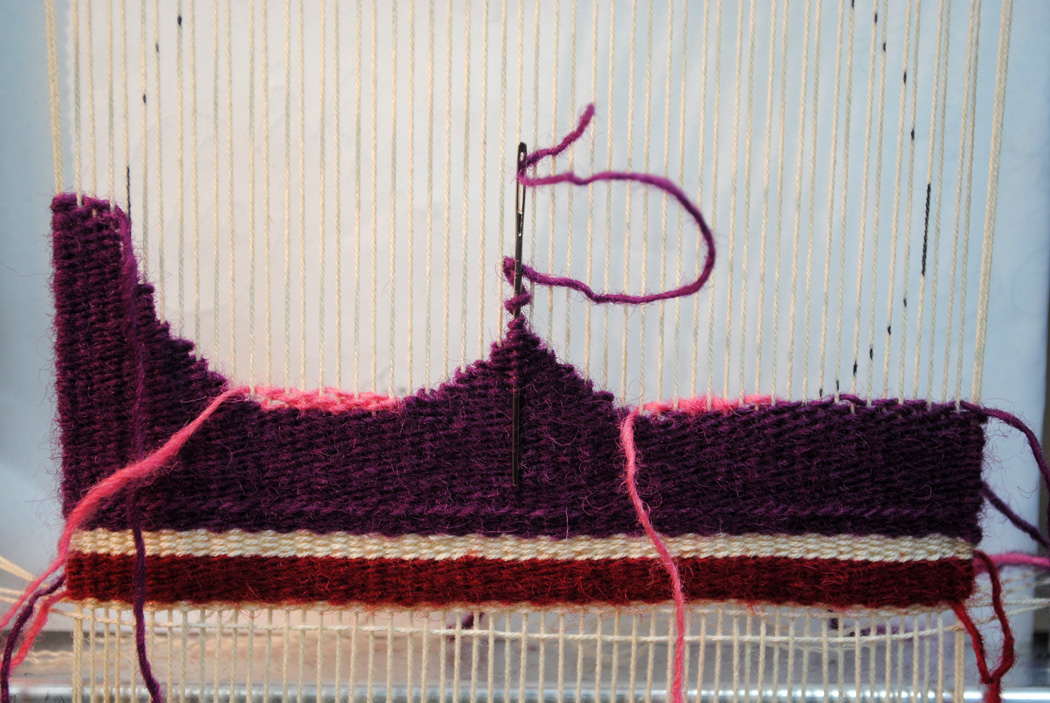
The next shape that has to be woven is the center background color because the pink sides of the heart will weave on top of it fairly quickly. The image below shows the center triangle woven as well as a little tip. When you come to the top of a shape like this where you're wrapping one warp to end it, you can needle that end down into the weft. I am weaving from the front here, so I did this and then tucked the end to the back through the weaving and will snip it off once the piece is off the loom.**
The next step is to fill in the right side of the background color. You must do this next because the right side of the pink will be weaving on top of it quickly.***
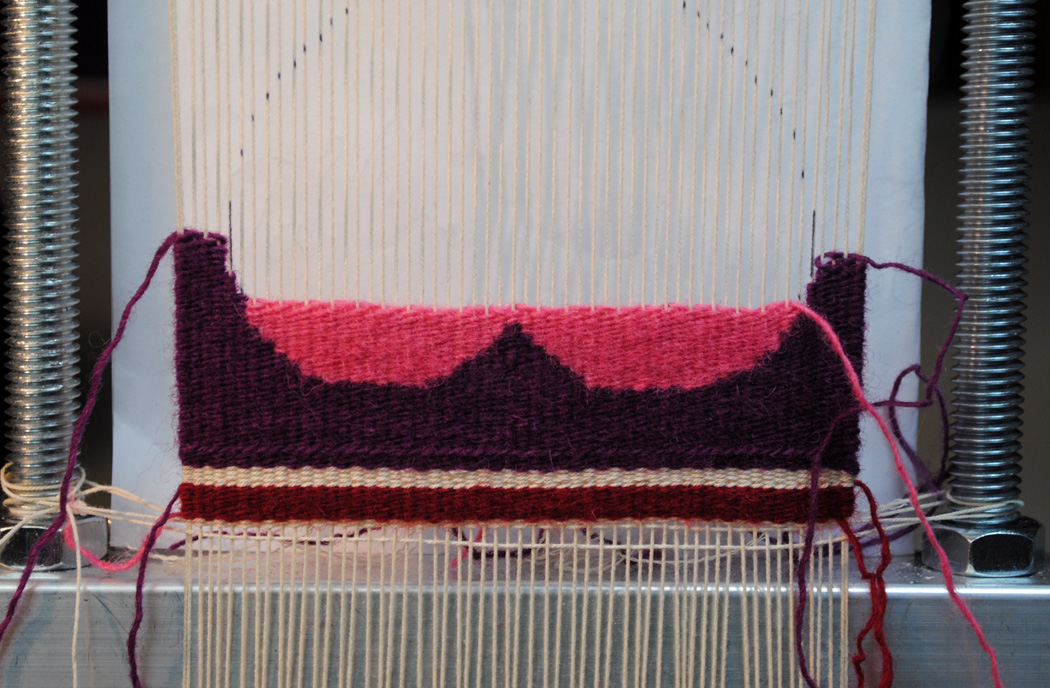
From here, fill in both sides of the pink (or whatever color! Hearts don't have to be red). Make sure you are bubbling appropriately so you have enough weft that your piece doesn't draw in at the sides. You can fill in the background color at the sides whenever you wish. If your piece is quite large, you might want to sew the slits on each side. I did not do this on this small piece.
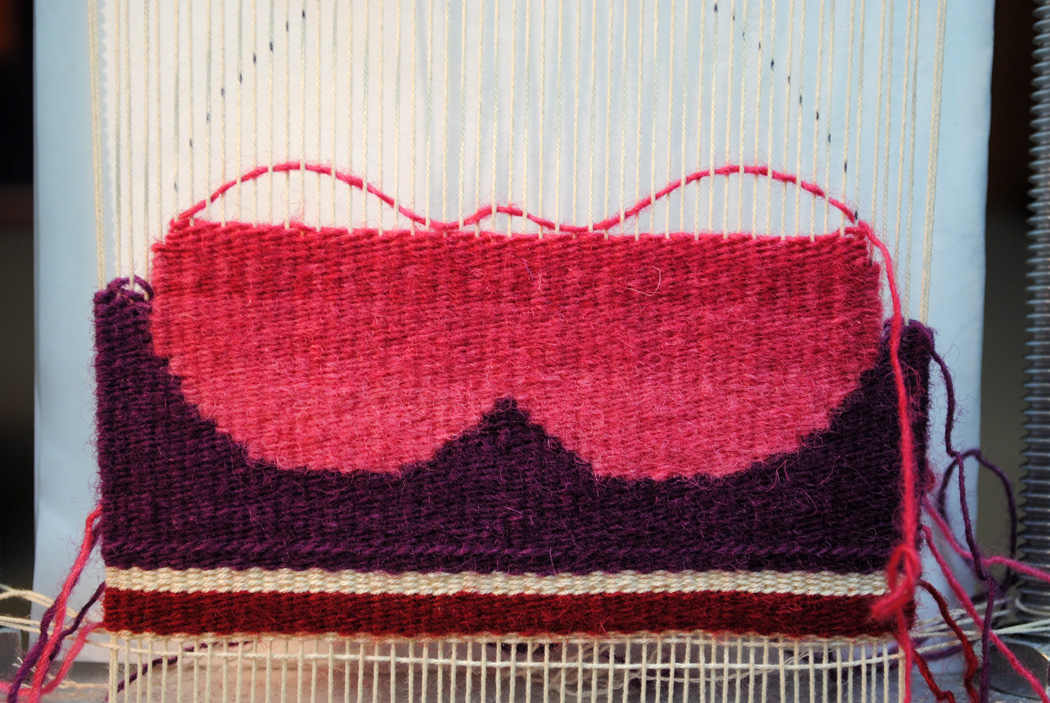

Continue to fill in the shape and the background colors. Put on the final header and some waste and you're ready to cut it off the loom.

Advanced design ideas
You can trial different design possibilities by cutting out multiples of a shape and moving them around. What if you had several different sizes of hearts? How could you stack them by size or use the same size several times overlapping? You could do this on a computer, but I favor cutting the pieces out of paper or thin cardboard and seeing what happens when you manipulate them by hand.
Often when moving around a set of shapes, I find a design that I really like. For example, what if you tried one of the below designs with the hearts? What other combinations can you make? What if your final design didn't even look like a heart? What if you cut the hearts into pieces? What if you added some other shapes? If I find something I like but I'm not done with the designing, I either photograph it or use tracing paper to make a copy of the design before trying something new.
If you're a more advanced tapestry weaver, see what sort of designs you can make. Decide how big you want the piece to be and then make your shapes such that they will utilize this space well.
If you're in my Color Gradation Techniques online class, think about how you could use a gradation technique with this design. Could you use regular hatching? A vertical gradation? What about the values. Did the values of the colors you chose work well to create the effect you have in mind? I used some pick and pick in the heart I wove to blend the colors more smoothly.


There are infinite possibilities. Some combinations are weave-able and some are not. For example, if the design on the left appeals to you, it would easily be possible with a size of 5 inches across or larger. Because the narrowest part between the two hearts occurs on a diagonal, this could be executed on a warp at 8 epi or smaller. If you wanted to weave that design smaller than 5 inches or on a warp that had a wider sett (4 or 6 epi), it could be a struggle to execute that thin diagonal line effectively.
Similar issues occur with the design at the right. The larger you weave it, the easier it is to render the shapes. But at a smaller sett (8, 10, 12 epi), this would be possible. Obviously the design at right is much more complicated than what I wove. If you haven't done much tapestry weaving, please start with just one heart. You can choose the size you'd like from the template depending on how large a loom you have and what options you have for sett. (Sett just means how many warp ends are in one inch.)
Get your project guide and do some weaving!
So are you ready to weave a heart? You can do this project on whatever loom you have.
Love Hokett looms? That is perfect.
Have a copper pipe loom languishing in the corner of a closet? Let her see a little action.
Have the remains of a warp on your floor loom you haven't cut off yet? Weave a heart.
Click the button below if you'd like the plans for this project. And if you're new to tapestry weaving, consider making this project in conjunction with my online class, Weaving Tapestry on Little Looms.
But most importantly, love each other.
Share your work! Hashtag it #thetapestryheart
Let's share the love. If you're in my online tapestry classes and are part of the private Facebook group for them, please share your images there. You can also share on Facebook and forward to my public page, Rebecca Mezoff Tapestry Studio (@RebeccaMezoffTapestry)
And of course if you're in the Weaving Tapestry on Little Looms online class, please share your work in a discussion question there. I've set up a special To-Do step near the end of the course.
On Instagram, please tag me @rebeccamezofftapestry and hashtag #thetapestryheart.
And on Twitter, @RMezoff and hashtag #thetapestryheart.
I'm betting you Ravelers will also post there. I am TapestryRebecca on Ravelry.
****Remember to leave at least 3 inches of threaded rod connecting the two pieces on a Mirrix or copper pipe loom. This is very important for stability.
*Weaving a heart shape on its side would mean that the sides of the shape could be smoother curves. Shifting the shape of the heart to a more tall, narrow heart and weaving it sideways can give you some really lovely lines. Consider some eccentric outline for the edges or a design in the middle!
**It is best to cut off all ends from the back of the piece. No matter how closely you cut, you may well see those cut ends if you cut them from the front.
***Unless you're using special knots or a scaffold, it is best not to weave tapestry in the middle of a warp unsupported.